Installation & Aftercare
To help you enjoy your solid wood worktop to the fullest, please read the recommended installation and aftercare guides displayed below carefully. Alternatively please click here to view as PDF.
Installation Instructions: Solid Wood Worktops
Please Note: It is important to identify the 'A' side and 'B' side of a worktop before making any cuts or other amendments; these sides are easiest to identify prior to oiling. Side 'A' has smooth and even surface, and must face upwards. The 'B' side has a slightly rougher surface; it also may contain a few small imperfections, which occur naturally in timber and do not affect the integrity of the worktop. If you have ordered a worktop with customisations and/or pre-oiling, the 'A' and 'B' sides will already be indicated and your worktop will be ready for installation.
Introduction:
Wood is a natural material. As such, moisture, heat and humidity are important variables to consider.
For example, wood expands when it is warm or if humidity is high and contracts in cooler temperatures or when humidity lessens. The wood can also lose moisture at any point during the installation process. Such occurrences can cause bowing or warping.
The following information contains the steps necessary to install and maintain your worktop, ensuring a long, trouble-free life. Please take some time to read this now in order to be fully prepared for the installation process. We recommend that you retain these instructions for future reference.
Do not discard any of the packaging until you have checked the contents thoroughly.
Storage:
We strongly advise oiling worktops as soon as these are received and commencing installation shortly after delivery.
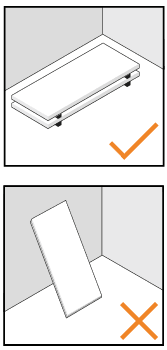
Once oiled on both sides, for storage, lay the worktops flat and fully supported on battens (please consult diagram below). Worktops must not be laid directly onto the floor.
Battens should also be used to separate multiple worktops if stored together (please consult diagram below).
- Indoors.
- Of a mild, stable temperature.
- Of a stable humidity.
- All cabinets / carcasses are fully fitted.
- The storage area is completely free of building debris and dust.
- All wet trades are finished and a sufficient period of time has passed, to allow for natural drying.
- Fresh plasterwork has been allowed to dry completely (for a minimum of 6 weeks).
Installation preparation:
Before installation commences it is vitally important to oil every edge and all faces of the worktop three times with Danish Oil. You must allow 6-8 hours between coats. Take care to wipe away any surplus oil 30 minutes after application.
NOTE: End grain and cut edges will absorb a greater quantity of oil and will therefore require extra coating.
Installation guidelines:
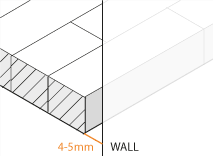
Be sure to allow a 4-5mm gap between all adjacent walls or units (particularly between the worktop and the wall) and all worktop edges. This gap will allow for sufficient expansion and contraction.
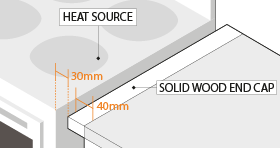
Be sure to allow a minimum gap of 30mm all around the worktop if the worktop is to be fitted near a freestanding oven (i.e. a range cooker). This will help protect the end grain and prevent damage.
Be sure to utilise a moisture barrier if fitting an appliance underneath the worktop or if fixing directly onto exposed brickwork. The worktop must be protected against extremes of heat and humidity.
NOTE: The maximum unsupported overhang for a 620mm worktop is 200mm. Overhang for other worktop sizes should be calculated on a pro-rata basis (for example, the recommended unsupported overhang for a 960mm wide worktop would be 110mm). We also recommend utilising a support leg(s) in certain cases.
Fixing worktop to cabinets:
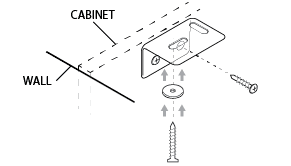
Use only slotted angle brackets for fixing worktops to cabinets, with a round head screw to fix the bracket. If your cabinet is supplied with an unslotted bracket, do not use this.
NOTE: Be sure to select the slot that runs perpendicular to the width (not parallel with but across the grain).
For cabinets with a solid top, or in instances when you can only secure through the cross rail, slotted brackets cannot be used. In such instances you must drill an oversized hole (8-10mm) through the carcass top and secure worktop utilising a large washer and screw. This will allow for any expansion and shrinkage by making it possible for the work surface to slide over the washer.
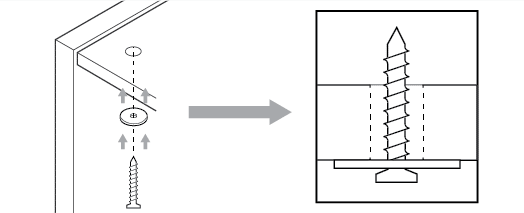
Do not screw through the carcass directly into worktop or use fixing blocks to secure. Only those methods recommended here should be used.
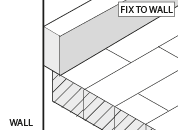
Where tiling or silicone is not used to cover the expansion gap, we recommend fitting an upstand along with the worktop. The upstand must be fixed to the wall (not the worktop).
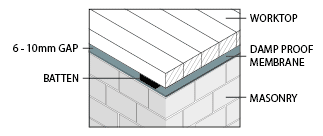
Worktops and masonry features
Do not fix wooden worktops directly into masonry. Instead, fit over 6-10mm thick timber spacers which are on a Damp Proof Membrane (DPM). This allows for air circulation under the worktop and prevents moisture transference.
Cutting & routing worktops:
Be sure to use any templates supplied with the sink/hob/similar as a guide for cutting your worktop. Ensure that everything is marked out correctly before making any cuts into your worktop.
Drainer grooves must be machined in by an experienced fitter. It is essential that the grooves are angled correctly for water drainage into the sink (if water sits in the grooves it can cause the worktop to split).
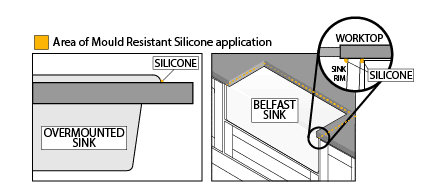
After the sink has been fitted, seal the area around the worktop/sink join with a suitable mould resistant silicone. The underside should receive a thorough application.
NOTE: All cut outs must be bench-cut using a jig plus suitable router (and not a jig saw). For further advice on the equipment required, please consult with our staff.
As soon as all cut-outs have been made, be sure to treat all cut edges with a sufficient amount of oil.
Installing your moisture barrier:
A moisture barrier is required to protect your worktop when installing appliances such as dishwashers and washing machines.
Before commencing installation, you will need a moisture barrier, moisture barrier tape, (both provided when a moisture barrier is ordered from us), and a general purpose silicone sealant (to be purchased separately).
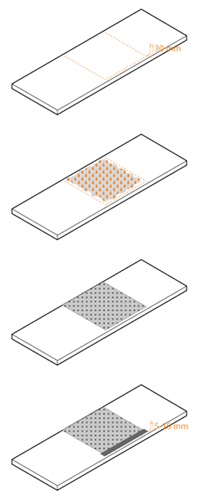
First mark the area which the moisture barrier needs to cover (where the relevant appliance is going to be placed). Please note that a gap of approx. 30mm should be left from the front side of the worktop.
Next apply adhesive to the area, dotting around evenly as indicated.
Now attach the moisture barrier. Please note that it is the non-reflective side of the moisture barrier (black in colour) that needs to be affixed to the worktop.
With the reflective, silver side exposed, place the moisture barrier against the adhesive. Spread the glue evenly by rubbing the barrier from the centre to the outside edges, making sweeping motions.
The moisture barrier should now be fixed firmly to the underside of the worktop.
The next step is to seal the edges with a strip of moisture barrier tape. Be sure to leave approximately 5-10mm from the front edge - this will provide an overlapping final protection, covering the edge of the moisture barrier and also the majority of the exposed worktop surface (leaving only a small gap at the edge of the worktop).
Jointing worktops:

Use three standard worktop bolts on each joint when joining two worktops together. Using a suitable sealer - such as MitreSeal - seal the end grain at both sides before making the joint. Seal again when the parts are tightened.
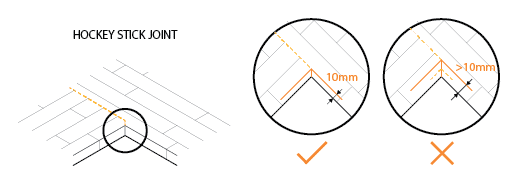
In most cases we recommend utilising only butt joints. However if your worktop has a radius and a mitre joint has to be used, please ensure that the 'hockey stick' does not over-extend the 10mm bull-nose radius.
How to seal corner joints:
Ensure that any end grain is sealed before assembling the joints. A light bead of clear low modulus silicone sealer should be applied along one side of the joint (just below top surfaces and edges). Align the two sides with biscuits before clamping firmly with worktop bolts. Any surplus sealant should be wiped off at this point.
Move the worktops into place, using thin piece of board as packing and positioning them with 4-5mm expansion gaps between edges, ends of the tops and walls.
Finishing worktops:
All worktops must be finished with oil to protect the surface. Our recommended product is Rustins Danish Oil.
Prior to oil application, ensure that the wood surface is dry and clean. Apply 4-5 coats to the face of the worktop, allowing 6-8 hours between coats for sufficient drying (this time may vary due to conditions of the room/temperature).
After fitting give the worktop a light sand with fine sandpaper. Ensure all dust is removed before applying the final coat of oil.
Spread the oil over the surface and leave to soak for 30 minutes. All areas should be covered with oil; if there are any dry patches, reapply a little more oil to these areas.
After 30 minutes wipe away all excess oil, leaving an even finish that is dry to the touch.
Leave overnight (at least 6-8 hours) before repeating.
Cupping/Bowing:
If the worktop cups or bows, it may be necessary to re-install your worktop (such occurrences are usually a result of moisture changes or prolonged/incorrect storage).
Please follow these instructions when performing your re-installation:
- Affix the entire length of the worktop's rear to the corresponding supporting units.
- Next - using battens and clamps - carefully and gradually pull the worktop downwards.
- Screw down the front edge.
NOTE: it may take a fortnight for the worktop to completely settle down. In time it should resume a flat shape.
Aftercare Instructions: Solid Wood Worktops
Following just a few simple rules will help you get the best out of your solid wood worktop. Our recommendations are as follows:
Direct Contact:
Wooden worktops need extra protection against certain items, such as heated pots and pans. We recommend stainless steel hotrods for this purpose.
Items which should not be placed directly onto the worktop include: most metal vessels (aluminium cans,iron, copper, or steel containers - these can stain the worktop), or hot, wet, or dirty objects.
Direct Cutting:
Please use a chopping board or butcher's block for any preparations that require cutting. Do not cut directly onto the worktop.
Spillages:
Do not allow liquids to stand or pool on the surface of the worktop. Any spillages must be wiped up immediately with a clean dry cloth.
Cleaning:
Attend to your solid wood worktops regularly by wiping down with a lint-free cloth. Use a small amount of warm (not hot) water and soap. Multipurpose cleaning products - or any other product that contains chemicals - should not be used; such products can damage the worktop.
Scouring pads should be avoided. Should a scouring pad be used, you may need to re-oil the worktop afterwards.
Oiling:
Regular oiling is essential; this will protect the fine quality of your worktop and improve its durability. We recommend oiling with Osmo Top Oil twice upon install and only where needed hereafter
Sufficient oil protection takes a little time to build up. As such, please take special care during the first few weeks of use. Do not allow water or other liquids to pool on the surface.
A well-oiled worktop will have a surface sheen and water will form into droplets on the surface. When this is no longer the case, it is time to re-oil (and ideally you will oil in advance of this).
With a comprehensive oiling schedule your worktop will build up its protective qualities. Regular re-oiling is needed to maintain this; this can vary depending on the conditions of the space and the amount of wear and tear, but we recommend oiling only when your worktop stops water beading on the surface.
Failure to follow these installation/aftercare instructions will result in a void product warranty.